A red light on the motherboard is one of those moments that stops every PC builder cold. You are anticipating that first successful boot, and instead you get a glowing red LED and a blank monitor. The reassuring part is that it almost always points to something fixable. A missed power connection, an unseated component, or a BIOS that needs a quick update to recognise new hardware are the usual suspects.
This guide will walk you through exactly what each red light means, which component it is pointing to, and the practical steps to get your system back up and running.
What Does a Red Light on a Motherboard Mean?
When a red light on the motherboard appears during startup, it almost always relates to the POST (Power On Self-Test) process. Every time you power on your computer, the BIOS runs a quick diagnostic check across all connected hardware. If something fails that check, the motherboard flags it with a red LED.
In situations where the system partially passes POST but fails later during boot, this can also lead to Windows startup errors, BSOD crashes, or system instability loops. This is actually a useful feature. Without it, a failed boot would leave you with nothing to go on. The red light at least tells you that the board is alive, the BIOS is running, and something specific caused the process to stop.
The red light does not mean your system is dead. If the motherboard light is red, it means something is not working correctly, and your job is to figure out what.
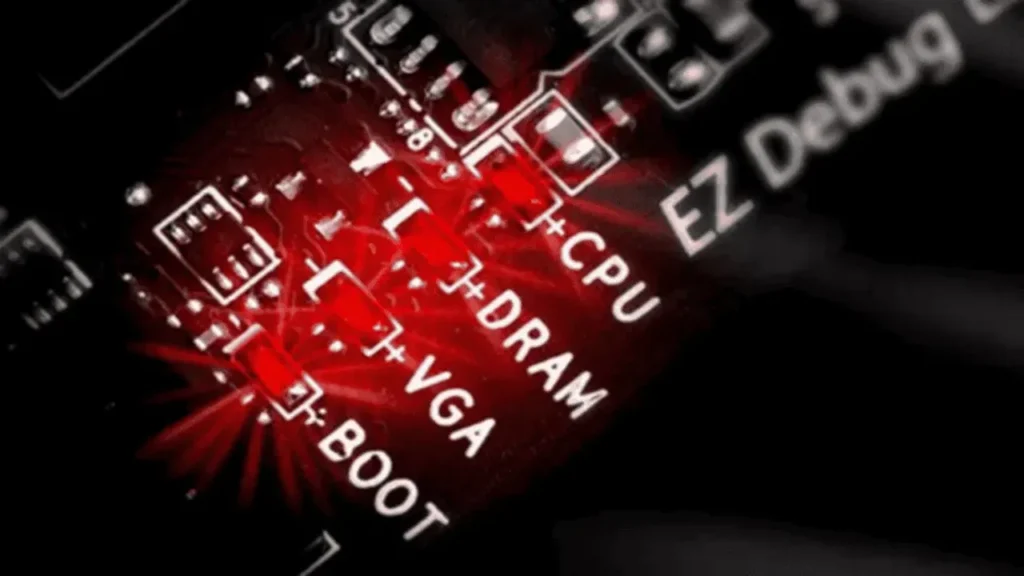
Understanding the Four Diagnostic LEDs
Most modern motherboards include four labeled diagnostic LEDs. These are usually positioned near the edge of the board or close to the CPU socket. The labels vary slightly by manufacturer, but you will generally see:
CPU | DRAM | VGA | BOOT
Each one corresponds to a specific hardware category. When a red LED lights up next to one of these labels, the motherboard BIOS is telling you that particular component failed its POST check. Here is what each one means.
CPU Red Light
The CPU light is the most common one to trigger. It means the motherboard is not detecting or communicating properly with your processor.
Common causes:
- The CPU is not properly seated in the socket
- Bent pins in the CPU socket or on the processor itself (AMD uses pins on the CPU; Intel uses them in the socket)
- The CPU fan is not connected to the correct header on the board
- The 8-pin CPU power connector at the top of the motherboard is not fully plugged in (this is the single most overlooked connection by new builders)
- A BIOS compatibility issue where the motherboard BIOS does not yet support your CPU
- A dead or dying processor
What to do:
Start by checking the 8-pin CPU power cable. It sits near the top corner of the board and is separate from the main 24-pin connector. New builders frequently forget this one entirely.
Next, reseat the CPU. Remove it carefully, inspect for any bent pins, and press it back into the socket until it clicks or locks into place depending on the socket type.
If you recently installed a new CPU on a slightly older motherboard, a BIOS update may be required. Many boards support a feature called BIOS Flashback, which lets you update the firmware using just a USB drive and power, without needing a working CPU or RAM installed. Check your motherboard manual to see if this applies to your board.
Finally, make sure the CPU fan is spinning and connected to the CPU fan header. Some boards monitor CPU temperature from the moment they power on and will refuse to boot if no cooler activity is detected.
DRAM Red Light
The DRAM light points to a problem with your RAM. This is the second most common red light people encounter, and it is often deceptively simple to fix.
Common causes:
- RAM sticks are not properly seated in their slots
- The side clamps did not click into place during installation
- Incompatible RAM (wrong generation, such as DDR4 sticks in a DDR5 board)
- RAM installed in the wrong slots (many boards require specific slots for single-channel or dual-channel operation)
- Faulty RAM module
What to do:
Power off, open your case, and firmly reseat your RAM sticks. Push down with even pressure on both sides until you hear a distinct click and the side clamps snap into place. If you have two sticks, try booting with just one in the recommended primary slot (usually A2 or B2, but check your motherboard manual).
One important note for DDR5 users: on platforms like AMD AM5 and Intel LGA 1851, the board performs a “memory training” process during first boot or after a BIOS reset. During this time, the DRAM light can stay red for several minutes. Do not shut the system off. Give it up to ten minutes before assuming there is a hardware fault.
VGA Red Light
The VGA light on the motherboard indicates a problem with your graphics card or display output. Despite the outdated name, this LED covers all modern GPUs, not just VGA-era hardware.
Common causes:
- The GPU is not properly seated in the PCIe slot
- The PCIe latch did not click into place
- Power cables to the GPU are not connected or are loose
- Insufficient power supply wattage for the GPU
- No monitor connected to the GPU (some boards trigger a red LED if they detect no display signal)
- A faulty graphics card
What to do:
First, check that the GPU power cables are firmly connected. On NVIDIA 40-series and 50-series cards using the 16-pin 12VHPWR connector, push the cable in until you hear a clear click with zero visible gap between the connector and the port. Even a small gap can cause instability or, in worst-case scenarios, connector damage. For 50-series cards specifically, using a dedicated cable from your power supply is recommended over a pigtail adapter.
If the GPU appears correctly installed and cabled, try connecting a monitor before you press the power button. Some high-resolution displays take a moment to wake up, and if the board does not detect a signal immediately, it may leave the VGA light on even after a successful boot.
You can also try testing with integrated graphics if your CPU supports it, which helps you determine whether the GPU itself is the issue.
BOOT Red Light
The BOOT light means your system cannot find a drive with a usable operating system on it.
Common causes:
- No storage drive is connected
- The drive is not properly connected to the SATA port or PCIe slot
- No operating system is installed on the drive
- The drive is connected to a disabled SATA port
- BIOS settings (CSM vs. UEFI) are mismatched with the drive’s partition style
- A corrupted operating system
- A failing or dead drive
What to do:
Start by verifying that your drive is physically connected. Check both the data cable and the power cable for SATA drives, or confirm that an M.2 drive is properly seated in its slot and secured with a screw.
Then head into your BIOS and confirm the drive is being detected. If you recently moved an older Windows installation to a new build, there may be a CSM vs. UEFI conflict. Older drives using MBR partitioning may not be recognised as boot devices on modern boards with CSM disabled by default. You may need to enable CSM in the BIOS or convert the drive to GPT using Windows tools.
If the drive is detected but still not booting, a clean operating system reinstall is often the fastest path forward. If your files were not backed up before the failure, data recovery is significantly harder.
Quick Reference Table
| LED | What It Points To | First Thing to Check |
| CPU | Processor not detected or communicating | 8-pin CPU power cable and CPU seating |
| DRAM | RAM issue | Reseat RAM sticks, check slot configuration |
| VGA | Graphics card issue | PCIe latch and GPU power cables |
| BOOT | No bootable drive found | Drive connections and BIOS detection |
General Troubleshooting Tips
If you have an older motherboard with a single unlabeled red LED, the above categories still apply. You just have to work through them methodically.
Start with what is called a minimalist boot: CPU, one RAM stick, and GPU only. No extra drives, no USB devices, no RGB hubs or fan controllers. Disconnect everything unnecessary. If the system POSTs successfully in this stripped-down state, add components back one at a time until the problem reappears.
Other things worth checking:
- CMOS battery: A dead CMOS battery can trigger various red light errors, including CPU and DRAM indicators. Replacing it with a fresh CR2032 is cheap and easy, and it is worth trying early in the process.
- Cable connections: Unplug and firmly reconnect all power cables, including the 24-pin main connector and the 8-pin CPU power cable.
- BIOS reset: If your system was working before and something changed, try resetting the BIOS to defaults. You can do this through the BIOS interface itself or by removing the CMOS battery for five minutes.
Could It Be the Power Supply or Motherboard?
If you have worked through every component and the red light persists, the problem may lie with the power supply or the board itself.
A failing power supply can still deliver enough power for fans to spin and LEDs to light up while not providing stable voltage to critical components. If you have access to a known-good power supply, swapping it in is a straightforward way to rule this out.
Diagnosing a bad motherboard is trickier because most boards show no visible signs of failure. The most reliable method is testing with components you know work, or taking your build to a repair professional who can run board-level diagnostics
Final Thoughts
A red light on the motherboard is your system communicating with you, not failing on you. Most of the time, the fix is something straightforward: a cable that is not fully pushed in, a component that is not properly seated, or a BIOS that needs updating to recognise new hardware.
Work through the steps methodically, consult your motherboard manual when in doubt, and resist the urge to start swapping out expensive components before ruling out the simpler causes. In the majority of cases, the answer is something small.
Still Seeing a Red Light? Let the Experts Take Over
Sometimes you work through every step and the red light stays on. At that point, the problem likely runs deeper than a loose cable or a BIOS update can fix. Computer Mechanics in Perth diagnose and repair computer hardware faults every day, with most jobs completed within 24 hours and no hidden fees. Book a repair today and let our team figure out what your motherboard is trying to tell you.
FAQs
1. What does a red light on a motherboard mean?
A red light on a motherboard means one of your internal components has failed the POST (Power On Self-Test) check that runs every time you power on your system. Most modern boards have four labeled LEDs: CPU, DRAM, VGA, and BOOT. Whichever one is lit tells you which component to investigate first. The motherboard light is red, not to alarm you, but to point you in the right direction.
2. Can a motherboard with a red light be fixed?
In most cases, yes. A red light on a motherboard rarely means the board itself is the problem. It is usually pointing to a connected component like the RAM, GPU, or CPU that is not seated properly or not getting enough power.
3. How do I fix a red light on my motherboard?
Start by identifying which LED is lit and work through the steps for that specific component. Check all power connections, reseat your hardware, and reset the BIOS if needed. If the motherboard light is red with no clear label, strip the system down to minimal components and add them back one at a time until the problem surfaces.
4. Do I have to replace my motherboard if the light is red?
Rarely. A red light on a motherboard almost never means the board needs replacing. The light is a diagnostic tool, not a fault indicator for the board itself. Run through the troubleshooting steps first. In most cases the fix is something simple like a loose cable or an improperly seated component.
5. Why is the VGA light on my motherboard red?
The VGA light on a motherboard typically means the board is not detecting your graphics card properly. This is usually caused by the GPU not being fully seated in the PCIe slot, a power cable that is not firmly connected, or an insufficient power supply.